![[Paul Ruby Amplifiers]](RubyAmplification.gif)
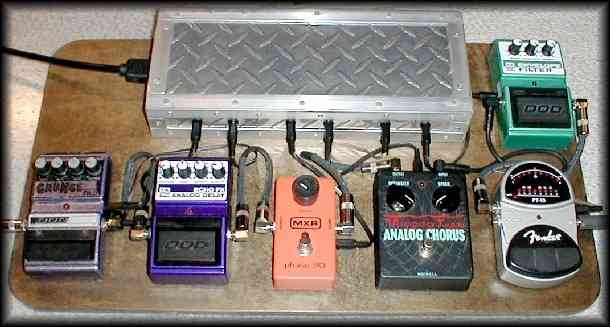
With good pedal boards costing $350 or more, making one yourself seems a good idea. But, if you play out, you don't want crummy looking or sounding gear. Here's a solution you can build yourself. Not only is it inexpensive and functional, but you'll get plenty of complements, too!!
contents
- guts are based on the spyder
- electrical bom of key components
- the board is 3/8" birch plywood
- the chassis turns heads!
guts
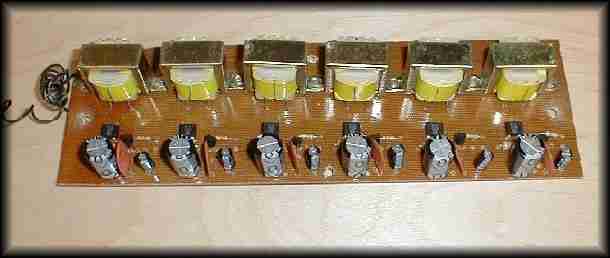
The guts of the system are based on the spyder power supply as designed by R.G. Keen over at Geo. Definately, go read about the spyder at Geo so you'll understand what's going on here. R.G. has the guts well covered so I won't repeat much.The key feature of the spyder is the use of independent transformers for each 9V output. This eliminates ground loops and means you must use plastic power jacks on your chassis for electrical isolation.
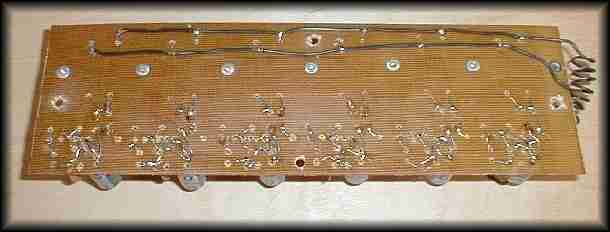
Being such a simple circuit, I drilled holes in G10 garolite and hand-wired on the bottom of the board. You can see in the pics the trannies are riveted to the G10 and there are four mounting holes drilled.
electrical bom
All the electrical stuff is available from Mouser.First you need the following to get started.
Elecrical chord, part number 173-63101
Power line connector, part number 161-0707-1
Fuse holder, part number 44FH033
1A Fuse, part number 504-AGC-1
You'll need the following for EACH individual supply.
12V Tranny, part number 41PG120
Bridge Rectifier, part number 583-DB101
78L09 Regulator, part number 511-L78L09ACZ
10 ohm current limit resistor, part number 281-10
Two (2) 1000uF caps, part number 140-HTRL16V1000
Two (2) 0.1uf ceramic caps, part number 80-C320C104K5R
Snap-in, plastic power jack, part number 163-1060
Two (2) power plugs (for power cables), part number 1710-0721
the board
The board itself is 3/8" birch plywood from Lowe's (or Home Depot, Home Base, ACE...). 2'x4' peices are pretty cheap. Corners are rounded with a coping saw and sanded smooth. Radius? I traced a plastic drinking cup that was handy. :) The pic below shows 3 of 4 bolts coming up from the bottom used to mount the circuit board. Pencil lines mark the lip of the chassis, which is tapped with sheet metal screws from the bottom to hold it.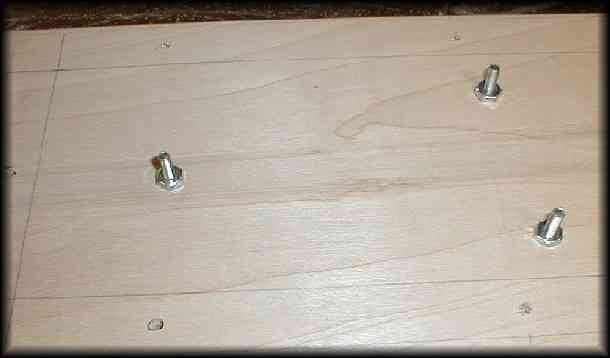
After some light sanding, the wood is rubbed with ebony stain, dried overnight, and finished with satin finish polyurethane. The next pic is the same as at the top of the page. It looks good, so here it is again. :)
The pedals are held in place with 2"x4" velcro pads, also from Lowe's. Note the use of plastic power jacks to isolate them from the chassis. Else, they would all be shorted together creating ground loops. For simplicity, there's no power switch or pilot light. Not shown, there are four large rubber feet screwed in the bottom.
chassis
The chassis turns heads! Aluminum tread plate at Lowe's is about $20 for 24"x12" and corner bead is about $5. Final size is 12"x5"x2.5" with an open bottom and 1/2" lips for mounting.
I must admit making the chassis as shown was not easy without the correct tools. Cutting metal is no fun without shears. So, now I have shears! (And a brake, polisher...) If you need a chassis, email me to discuss.
Some folks may remember my first pedal board. I still have the web page posted but it was definately a learning experience.
ruby amplification is not associated with ruby tubes
content & layout © copyright ruby amplification 2002
all rights reserved
content & layout © copyright ruby amplification 2002
all rights reserved